Want to make your photos pop with a creative twist? Inserting an image into a shape in Photoshop is one of the simplest ways to give your design a cool, professional look, without doing anything complicated.
Whether you’re designing a flyer, Instagram post, or just experimenting, this trick takes only a minute and looks amazing.
Here’s how to do it step by step:
Easiest Way To Insert an Image Into a Shape | Photoshop Tutorial
Step 1: Create Your Shape
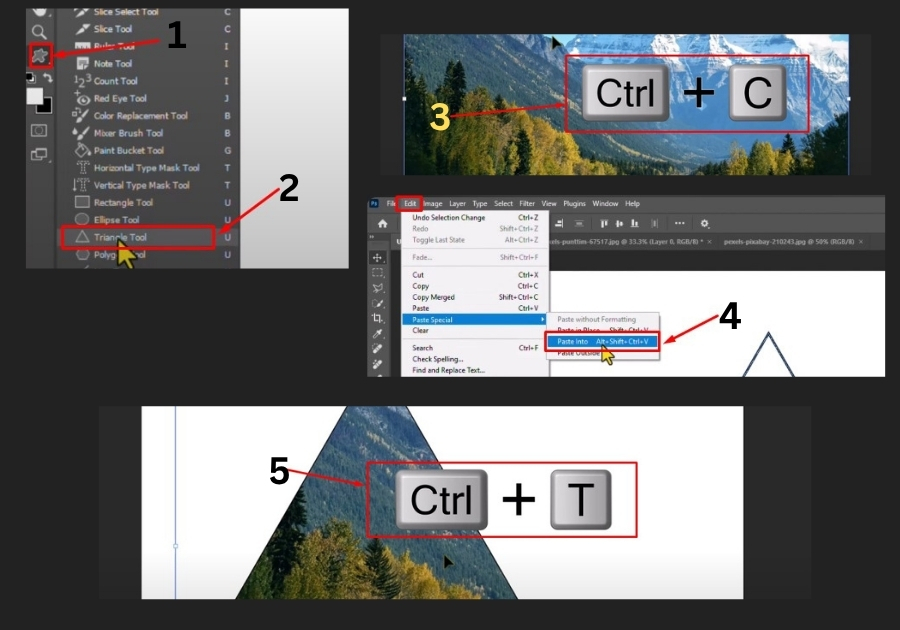
Start by opening Photoshop and creating a new project. On the left side, find the Tool Panel and pick a shape tool. For this example, I’ll use the Triangle Tool. Click and drag on your canvas to draw a triangle. Don’t worry about perfection, you can tweak it later.
Once your shape is drawn, head to the Properties Panel (usually on the right). Here, you can customize your shape. Want a clean look? Turn off the Fill or Stroke. Or, if you like a border, add a stroke by adjusting the settings. Play around until it looks good to you.
Step 2: Prep the Shape for the Image
Now, let’s get the shape ready for your image. Hold down the ** key (Alt on Windows) and click the shape layer in the Layers Panel (that’s the panel on the left bottom, where all your layers are listed). This selects your shape perfectly, making sure your image stays inside the lines.
Step 3: Copy Your Image
Open the image you want to insert. It could be a photo, a texture, anything you like. If the image layer is locked (check for a padlock icon in the Layers panel), click the lock icon to unlock it. Then, hit Ctrl+C (or Cmd+C** on Mac) to copy the image.
Step 4: Paste the Image Into the Shape
Go back to your project with the shape. From the top menu, click Edit and then choose Paste Special > then Paste Into. Boom! Your image now sits inside your shape. It might not look perfect yet, but we’ll fix that next.
Step 5: Adjust the Image
To make the image, press Ctrl+T (Cmd+T on Mac) to enter Transform Mode. This lets you resize or move the image inside the shape. Zoom out if you need more space (use the mouse wheel or Ctrl+-). Drag the corners to resize or reposition the image until it fits just right. Happy with it? Click the Done button or hit the Enter key.
And that’s it!
You’ve just inserted an image into a shape in Photoshop. This trick works with any shape, circles, stars, or custom shapes, so go wild and experiment. It’s a simple way to make your designs stand out.