Adding text to a surface in Photoshop might seem tricky at first, but it’s actually pretty simple once you know the steps. Whether it’s a wall, a t-shirt, or a signboard, you can make your text look like it was meant to be there.
In this guide, we’ll walk through how to blend text naturally onto any surface using basic tools and just a few clicks. No complicated techniques, just a clear, beginner-friendly process that gets the job done right.
Add Text on Any Surface in Photoshop
Step 1: Duplicate Your Image Layer
Start by opening your image in Photoshop. First, duplicate your image layer. Just right-click on the layer in the Layers panel and select “Duplicate Layer.” This gives you a backup layer to work with, keeping your original safe. Select the duplicated layer (the one on top) to start editing.
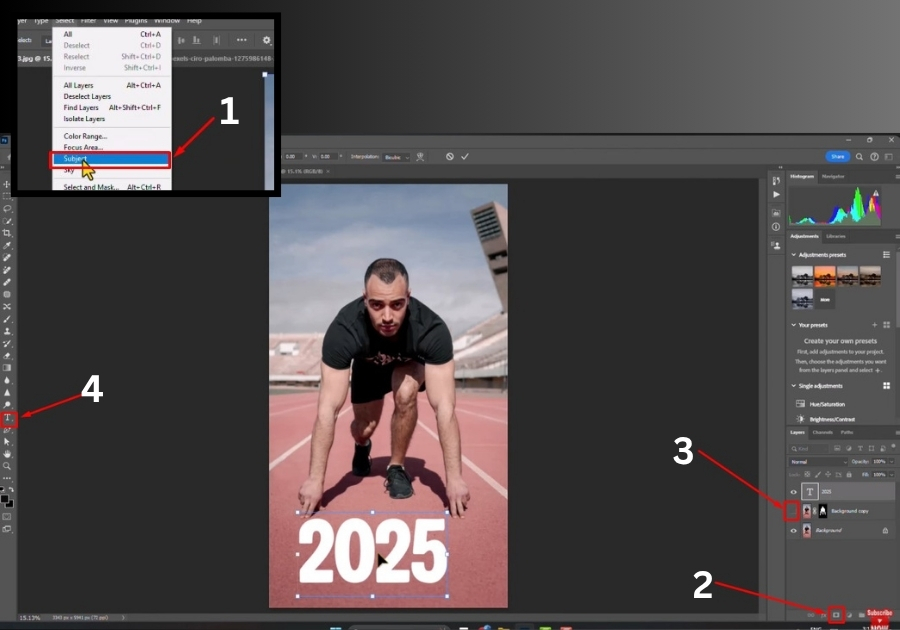
Step 2: Select the Subject
With the top layer selected, go to the “Select” menu at the top and click “Subject.” Photoshop’s smart selection tool will automatically outline the main subject in your image in just a few seconds. Once the subject is selected, click the “Add Layer Mask” icon at the bottom of the Layers panel to create a mask. Now, hide the top layer by clicking the eye icon next to it.
Step 3: Add Your Text
Grab the Text Tool from the toolbar (it looks like a “T”). Click on your canvas and type your text. Want to switch up the vibe? Change the text color by selecting the text and picking a new color from the color picker. You can also adjust the text size using the font size dropdown in the top toolbar. Play around until it looks just right.
Step 4: Position the Text Layer
In the Layers panel, drag your text layer so it sits between the original image layer and the masked (hidden) duplicate layer. This order is key for the next steps, so double-check it.
Step 5: Copy the Text
Right-click on the text layer and choose “Select Pixels” to highlight your text. Press Ctrl + C (or Cmd + C on a Mac) to copy it. Now, delete the text layer; you won’t need it anymore. Create a new blank layer between the two image layers by clicking the “New Layer” icon at the bottom of the Layers panel.
Step 6: Open Vanishing Point
With the new blank layer selected, press Ctrl + D (or Cmd + D) to deselect any active selection. Now, go to the “Filter” menu and select “Vanishing Point.” This opens a tool that lets you map your text onto a surface.
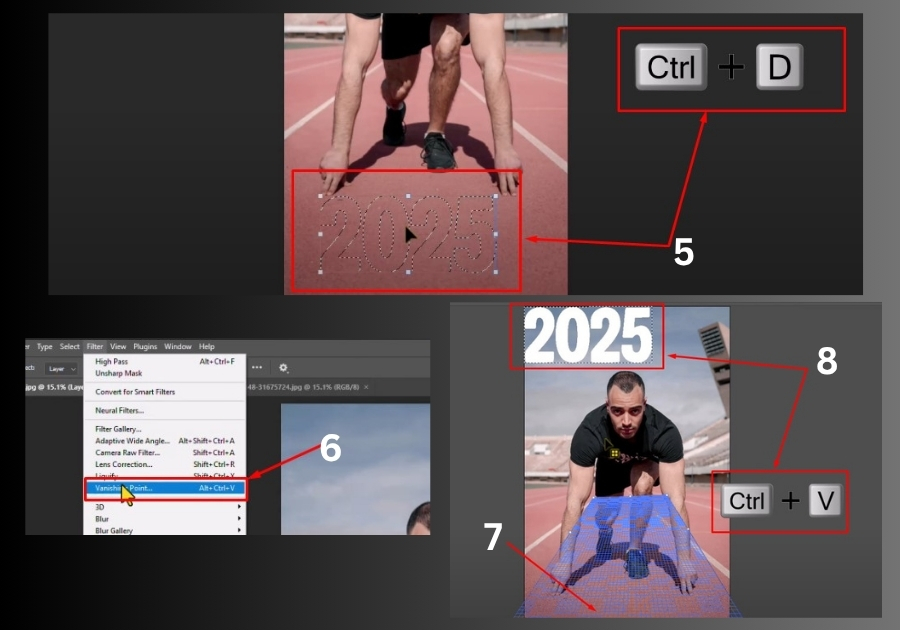
Step 7: Define the Surface
In the Vanishing Point window, use the Create Plane Tool to draw a grid on the surface where you want your text to appear. Click and drag to create a four-point grid that matches the perspective of your surface (like a wall, floor, or object). You can adjust the grid by dragging the corners to make it larger or smaller until it fits perfectly.
Step 8: Paste and Adjust the Text
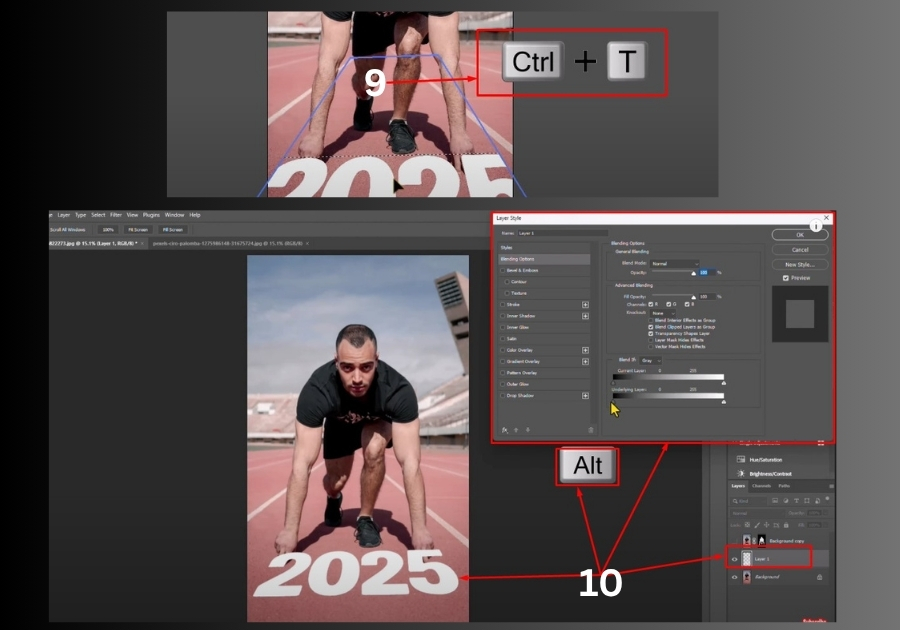
With the grid set, press Ctrl + V (or Cmd + V) to paste your copied text into the Vanishing Point window. Drag the text onto the grid, and it’ll snap to the surface’s perspective. To fine-tune, press Ctrl + T (or Cmd + T) to transform the text. Resize or rotate it to match the surface naturally. When you’re happy with the placement, click “OK” to apply.
Step 9: Blend the Text
Back in the main Photoshop window, double-click the text layer to open the “Layer Style” panel. Hold the Alt key (or Option on a Mac) and click the “Blend If” slider under “Underlying Layer.” Drag the sliders to blend the text with the surface’s texture and lighting. This makes the text look like it’s part of the surface. Adjust until it feels seamless, then click “OK.”
Step 10: Final Touches
Unhide the top (masked) layer by clicking the eye icon in the Layers panel. This brings back the subject and completes the effect. If needed, tweak the blending sliders or text position to perfect the look.
And that’s it!
You’ve just made your text look like it’s really painted, printed, or stuck onto any surface inside Photoshop. Perfect for adding logos to walls, labels on boxes, or titles in a scene without it looking fake.