Want to add some style to your images with rounded corners? This simple technique can make your photos look more modern and polished, whether you’re creating social media graphics, web designs, or just want to jazz up your pictures.
Let’s dive into this easy Photoshop trick that takes less than two minutes.
Step-by-Step Guide to Rounding Corners
1. Unlock Your Layer
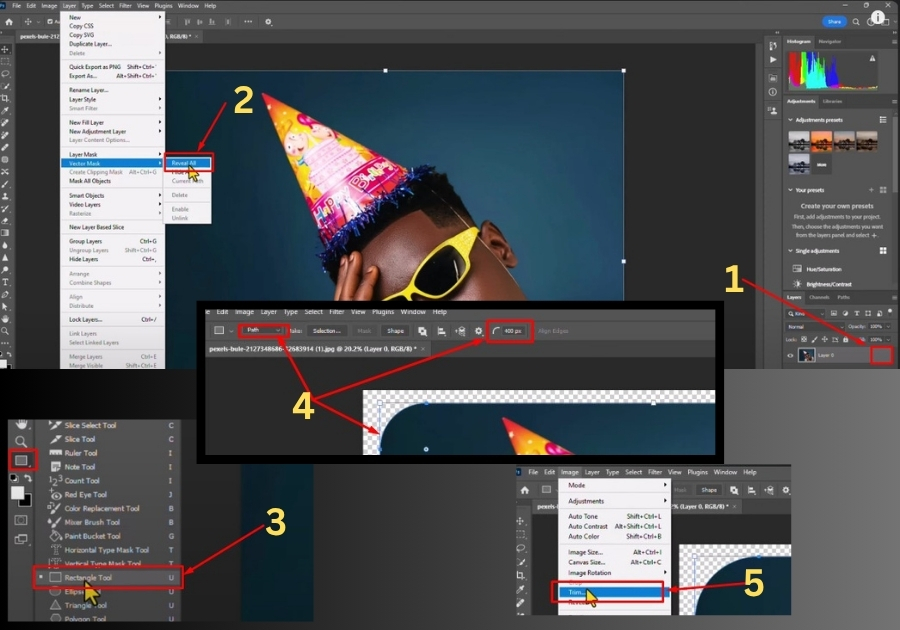
First, make sure your layer is ready to edit. In the Layers panel, find your image layer and double-click the lock icon to unlock it. This lets you make changes without restrictions.
2. Add a Vector Mask
Head to the top menu and click Layer > Vector Mask > Reveal All. This creates a mask that lets you shape your image without permanently altering it. Think of it as a stencil you can tweak anytime.
3. Select the Rectangle Tool
On the left toolbar, grab the Rectangle Tool (it looks like a square). In the options bar at the top, make sure the Path mode is selected. This mode helps you create a shape that defines your rounded corners.
4. Set the Corner Radius
Still in the options bar, look for the corner radius field; it’s usually a little box with rounded edges. Type in your desired value. For a noticeable curve, try 400 pixels. You can always adjust this later, so don’t worry about getting it perfect the first time.
5. Draw the Rounded Rectangle
Click and drag on your image to draw the rounded rectangle. This shape becomes your image’s new outline, giving it those smooth corners. Don’t stress about precision, Photoshop snaps the shape to fit nicely.
6. Fine-Tune with the Properties Panel
To make adjustments, go to Window > Properties to open the Properties panel. Here, you’ll see sliders for the corner radius. Slide them to tweak the curve until it looks just right. This is great for experimenting without starting over.
7. Trim Extra Space (Optional)
If your image has extra transparent space around it, tidy it up by going to Image > Trim. In the pop-up, hit OK to crop the excess. This keeps your file clean and compact.
8. Save Your Work
Once you’re happy with the result, save your image. Go to File > Save As, choose your format (like PNG or JPEG), and you’re done! Your image now has stylish, rounded corners.
That’s it!
With just a few clicks, you can transform any image with rounded corners in Photoshop. Play around with the corner radius to match your project’s style. Got a question or a cool tip to share? Drop it in the comments below!