Need to turn a regular image into a clean, scalable vector in Photoshop?
You’re in the right place. Whether you’re working on a logo or preparing artwork for print, vectorizing can give your image a sharp, professional edge.
In this quick tutorial, I’ll walk you through the exact steps to vectorize your image using tools you already have in Photoshop.
Step-by-Step Guide to Vectorizing Your Image
Step 1: Set Up Your Layers
Open your image in Photoshop. You’ll see it as the background layer in the Layers panel. If your subject (the part you want to vectorize) is on a separate layer, great! If not, create a new layer for your subject by selecting it and copying it to a new layer. Name this layer something like “Subject” to keep things organized.
Step 2: Select Your Subject
Hold down the Ctrl key (or Cmd on a Mac) and click on the thumbnail of your Subject layer in the Layers panel. This creates a selection around your subject, highlighting it with those marching ants.
If your subject isn’t perfectly isolated, you might need to refine the selection using tools like the Quick Selection Tool before moving on.
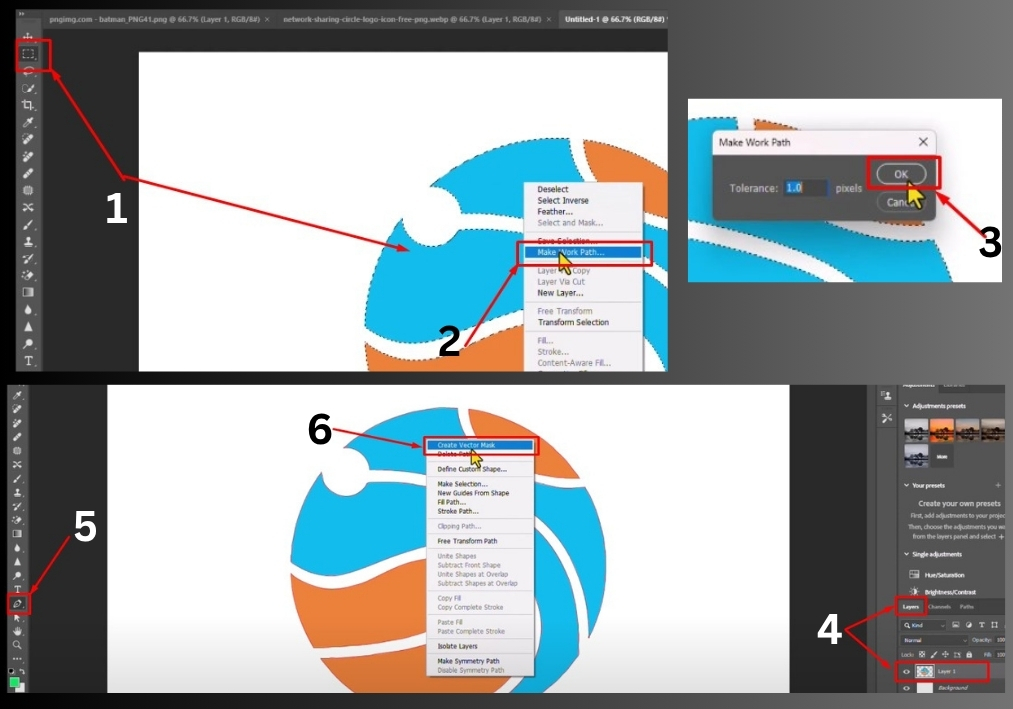
Step 3: Create a Work Path
With your subject selected, grab the Marquee Selection Tool from the toolbar (it’s the dotted rectangle icon). Right-click anywhere on your selected subject, and a menu will pop up. Choose Make Work Path.
A dialog box appears asking for a tolerance value, set it to 1.0 pixels for a nice balance of precision and smoothness. Click OK, and you’ll see a path outline of your subject in the Paths panel.
Step 4: Convert to a Vector Mask
Make sure your Subject layer is still selected in the Layers panel. Now, select the Pen Tool from the toolbar.
Right-click on your subject again, and this time choose Create Vector Mask. Boom! Photoshop converts your selection into a vector mask, which is the magic behind a vectorized image. Your image is now scalable without losing quality.
Step 5: Check Your Work
Zoom in and out to admire your vectorized image. It should look sharp at any size. If you need to tweak the path, you can use the Direct Selection Tool to adjust anchor points on the vector mask.
Save your file as a PSD to keep the vector mask editable, or export it as an SVG for use in other programs.
That’s it!
In just a few clicks, you’ve turned a regular image into a vector masterpiece in Photoshop. Play around with the Pen Tool or tweak your paths to get the exact look you want.