
Want to add a professional touch to your videos without blocking important content?
CapCut makes this surprisingly easy using a clever green screen trick. This simple technique lets you brand your videos while keeping them clean and viewer-friendly.
You don’t need fancy software or expensive tools – just follow these simple steps to create watermark text that blends seamlessly with your content.
Simple Guide to Create a Transparent Watermark in CapCut PC
Step #1
Start by opening CapCut on your PC and creating a new project. Drag a green screen background into your timeline. This green screen will act as a temporary backdrop to help create the transparent effect later. Make sure it spans the length of your video or the duration you want for your watermark.
Step #2
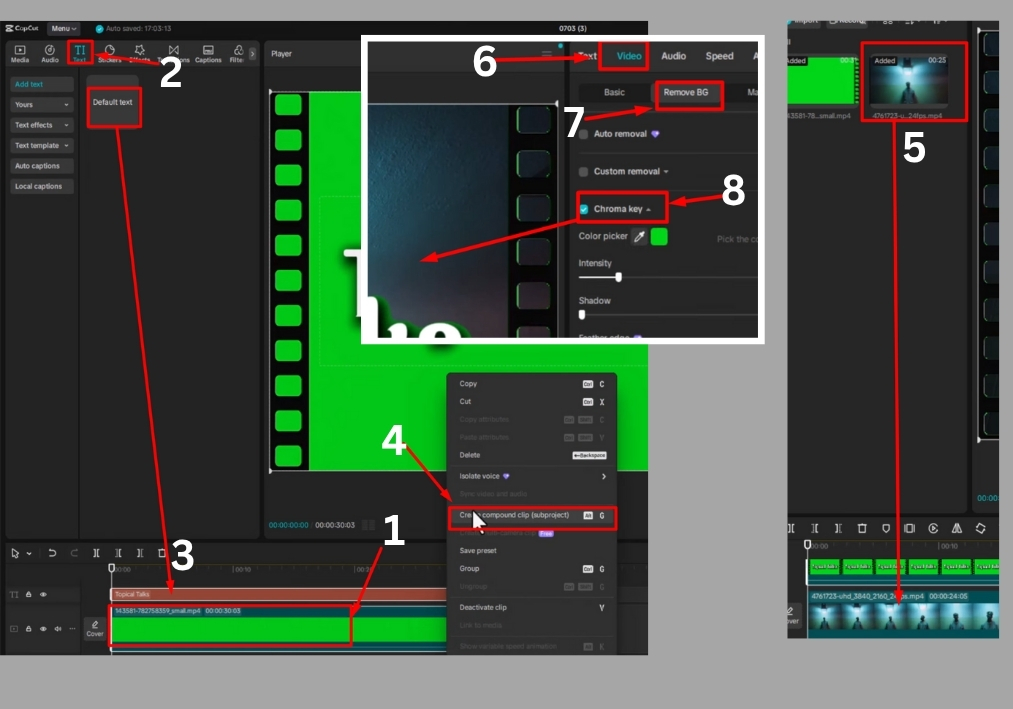
Head over to the Text tab in CapCut. Click to add a new text layer to your timeline. Type in your watermark text, maybe your name, brand, or logo phrase. Adjust the text duration to match your video length by dragging the edges of the text layer in the timeline.
Next, customize the text. Click on the text layer, then edit the font and size to fit your style. Play around with different fonts to find one that matches your video’s vibe.
Step #3
Scroll down in the text editing panel until you see the Shadow option. Click it, then increase the opacity of the shadow. This gives your text a bit of depth, making it pop against the green screen background. Don’t overdo it, just enough to add a subtle effect.
Step #4
Select both the text layer and the green screen background layer in the timeline. Right-click and choose Create Compound Clip. This merges the two layers into one, which is key for applying the transparent effect in the next steps.
Step #5
Now, import the video you want to add the watermark to. Drag it into the timeline, placing it below the compound clip you just created. This ensures your watermark will appear over your main video.
Step #6
Select the compound clip in the timeline. On the right side of CapCut, go to the Video tab and find the Remove Background section. Click on Chroma Key. Use the color picker tool to select the green color from your compound clip. Once selected, increase the intensity slider until the green background disappears, leaving just your text.
Step #7
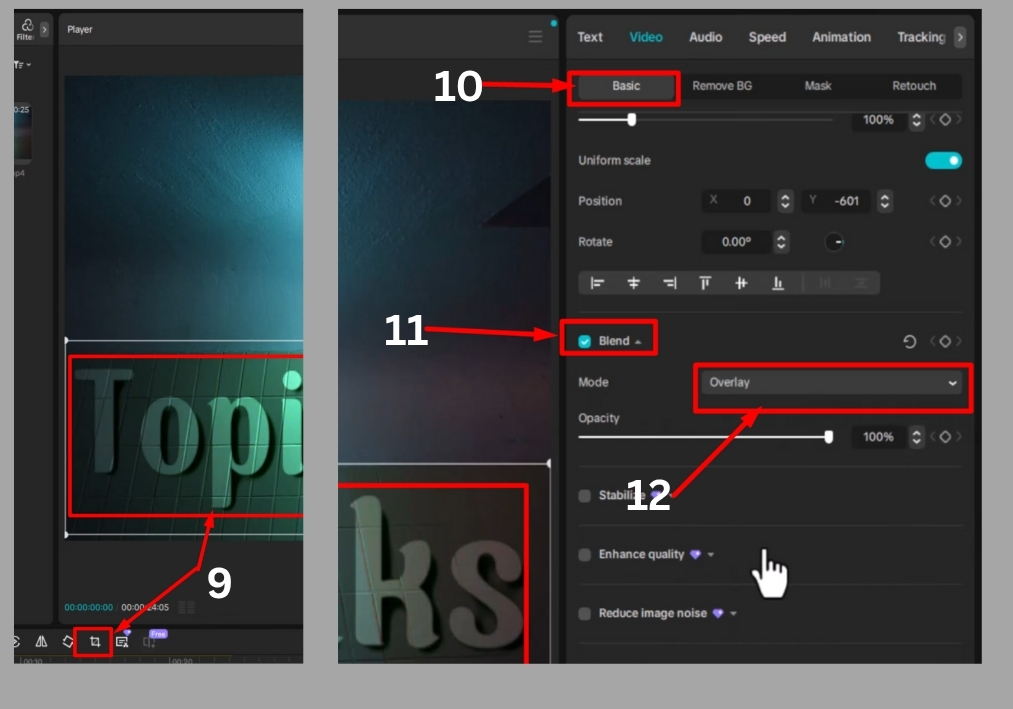
With the green screen gone, your text should now look like a floating watermark. Use the Position tool to move it to your desired spot on the video, maybe a corner or center, depending on your preference. If the text feels too large or small, use the Crop tool to resize it until it looks just right.
Step #8
To make the watermark transparent, go to the Basic tab in the video settings. Scroll down to find the Blend option. Change the blend mode from Normal to Overlay. This blends the text into your video, giving it that sleek, semi-transparent look that’s perfect for watermarks.
And that’s it!
You’ve just created a professional, transparent watermark in CapCut PC. This simple trick adds a polished touch to your videos without being too in-your-face.