Mistakes happen. Backing up your Premiere Pro project is a lifesaver. Maybe you are editing a short clip or a full-blown video, and you don’t want to lose hours of work. Files get corrupted, computers crash, or you accidentally delete something important. A backup ensures all your hard work is safe.
But how to do the backup? Let’s check these simple steps below:
Backup Your Project in Premiere Pro
Step 1: Open Project Manager
First, launch your project in Premiere Pro.
Now go to the File menu and click on Project Manager.
Step 2: Choose Your Sequences
In the Project Manager window, you will see a list of all the sequences in your project. If you want to back up everything, just select all of them.
Step 3: Adjust the Settings
Under Options, you will find a few settings. For a clean backup, it’s usually a good idea to uncheck:
- Include Audio Conform Files
- Include Preview Files
This helps keep the backup size smaller and more organized.
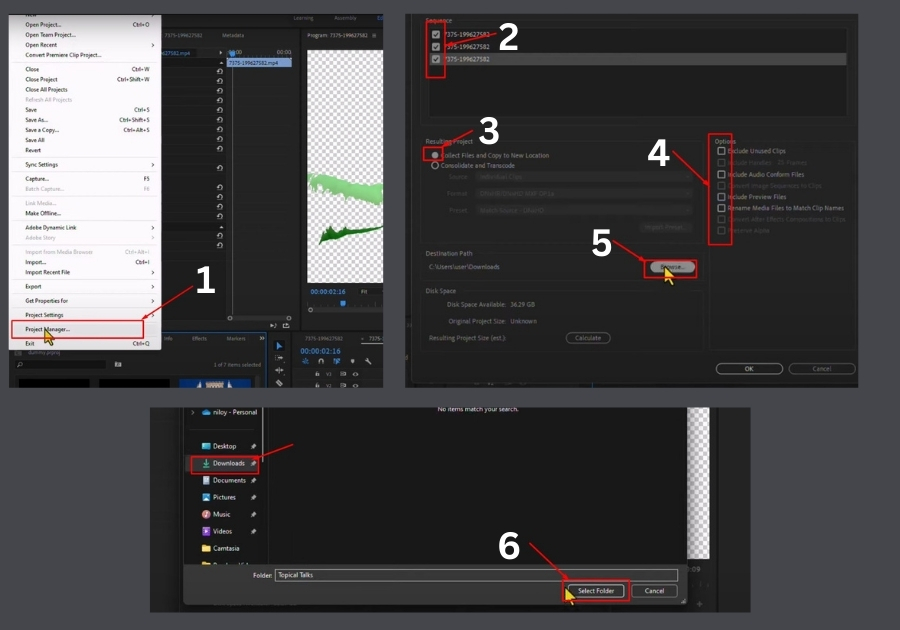
Step 4: Pick a Backup Location
Click Browse and choose the folder where you want to save your backup. Make sure it’s a spot you will remember; don’t just dump it somewhere random on your desktop.
Step 5: Check the Size (Optional but Handy)
Hit Calculate to see how much space the backup will take. If everything looks good, click OK, then Yes when it asks for confirmation.
Step 6: Done! Check Your Files
Now open up your file explorer and head to the folder you picked. You’ll see a full backup of your project ready to go.
Quick Tips
- Backup regularly: Make it a routine, especially after major edits.
- Use an external drive: Keep backups separate from your main computer for extra safety.
- Double-check the folder: Ensure your backup file is actually there before you need it.
That’s it! Now you have got a solid backup of your Premiere Pro project and can breathe a little easier knowing your hard work is safe.