
Want to view and work with PDFs right in your Google Chrome browser? Adobe Reader, also called Adobe Acrobat extension, is what you need.
This extension makes handling PDFs a breeze. Whether you need to view a document, add comments, or even sign a PDF, Adobe Acrobat has you covered, all without leaving your browser. It’s a real time-saver!
This quick guide will show you the simple process of enabling Adobe Reader in your Chrome browser.
Enable Adobe Reader in Google Chrome
Step 1: Open Google Chrome
First, open your Chrome browser on your computer.
Step 2: Head Over to the Chrome Web Store
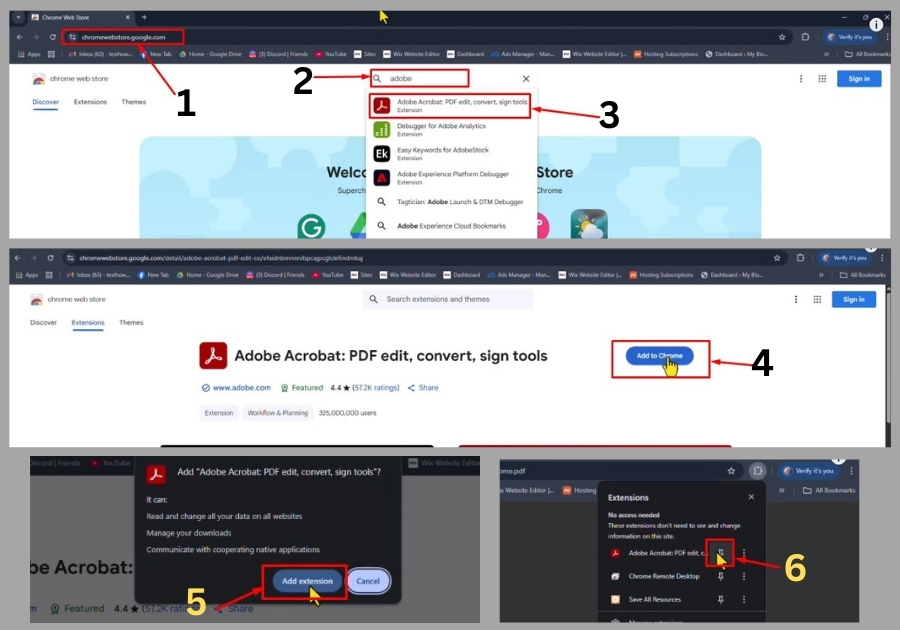
In the search bar, type Chrome Web Store and hit Enter. Click the official link to access the store.
Step 3: Search for Adobe Acrobat
Once you are inside the Chrome Web Store, look for the search box that says “Search extensions and themes.” Type in Adobe Acrobat.
You will see the official Adobe Acrobat extension pop up. (It might be labeled as Adobe Reader depending on the version, but both are from Adobe and do the same thing.)
Step 4: Add It to Chrome
Click Add to Chrome next to the Adobe Acrobat extension. A pop-up will show; go ahead and click Add Extension.
Chrome will take a few seconds to install.
Step 5: Pin the Extension
Once installed, look at the puzzle icon on the top-right corner of Chrome (next to your profile picture). Click it, find Adobe Acrobat, and hit the pin icon. That will keep it visible on your toolbar for easy access.
Step 6: Sign In to Adobe
Click on the Adobe Acrobat icon you just pinned. It will ask you to sign in to your Adobe account. If you don’t have one, you can create it quickly.
After signing in, you are all set. You can now open, edit, or manage your PDFs right from Chrome, super convenient!
That’s all!
Enabling Adobe Reader (Acrobat) in Chrome takes just a couple of minutes and makes handling PDFs much more convenient. No more downloading separate software, just work with your PDFs right in your browser.