Adding a timer to your videos is a handy technique that can enhance your content in multiple ways. If you’re editing a video and want to show a running timer or display the timecode on screen, Adobe Premiere Pro makes it surprisingly simple.
When you are creating a tutorial, cooking video, workout session, or simply want to show the elapsed time in your footage, Premiere Pro makes it easy to add a professional-looking timer.
You don’t need any plugins or complicated steps, It’s just a built-in effect that most people already have installed.
Add Timer in Premiere Pro
1. Import and Place Your Clips
First, open Premiere Pro and import the video clips you want to work with. Drag them onto your timeline to set up your project. This is your starting point before adding the timer.
2. Find the Timecode Effect
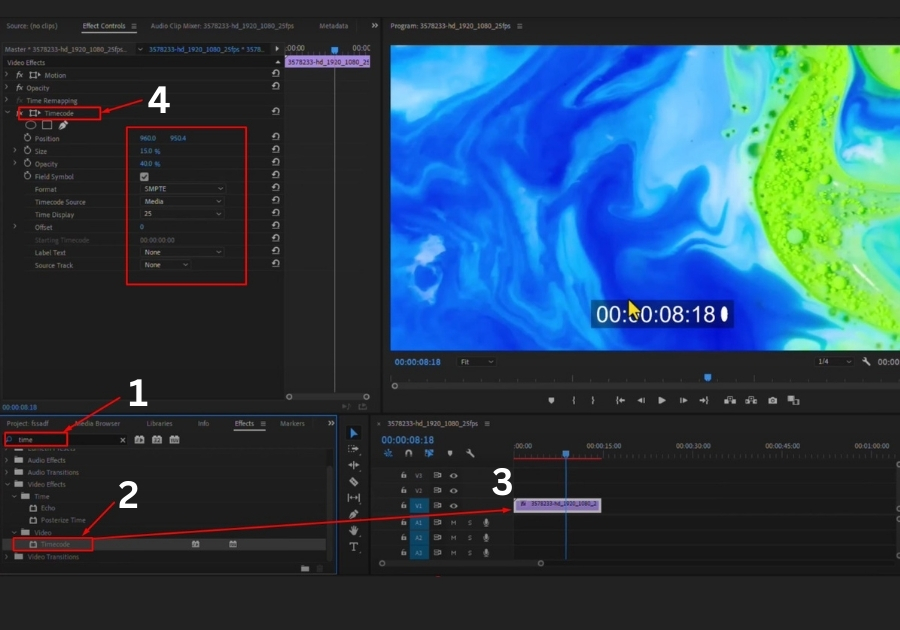
Head over to the Effects panel. In the search bar, type “timecode”. You will see the Timecode effect pop up. This is the tool that will add the timer to your video.
3. Apply the Timecode Effect
Drag the Timecode effect onto the clip in your timeline where you want the timer to appear. Once applied, you will notice a timer show up on your clip in the preview window.
4. Customize Your Timer
Now, let’s tweak the timer to fit your style. Select the clip in the timeline, then go to the Effect Controls panel. Here, you will see the Timecode effect settings. You can play around with a few options:
- Hide Symbols: If you see extra symbols in the timer and want a cleaner look, uncheck the “Fill Symbol” box.
- Change Format: You can pick different timer formats, like SMPTE (a standard for video timecodes), frames, or feet (for film). SMPTE is usually the go-to for most projects.
- Timecode Source: Choose whether the timer follows the clip’s timing or the entire sequence. For most cases, selecting “Clip” works perfectly.
- Time Display: Adjust how the time is shown, like switching between 24-hour and 12-hour formats.
5. Check Your Work
Once you have made your changes, play the video in the preview window. You should see the timer running smoothly on your clip, exactly where you want it. If it’s not quite right, go back to the Effect Controls and tweak the settings until it’s perfect.