If you have finished editing your video in CapCut for PC and want it to look crisp and professional when shared online, your export settings matter.
In this quick guide, I will show you the best export settings to use step by step so your video keeps its quality without blowing up the file size.
Easy & Simple Guide to Video Exporting in CapCut
Step # 1
Before you export, double-check that your video edits are exactly how you want them. Once everything looks good, you are ready to move on to the export process.
Step # 2
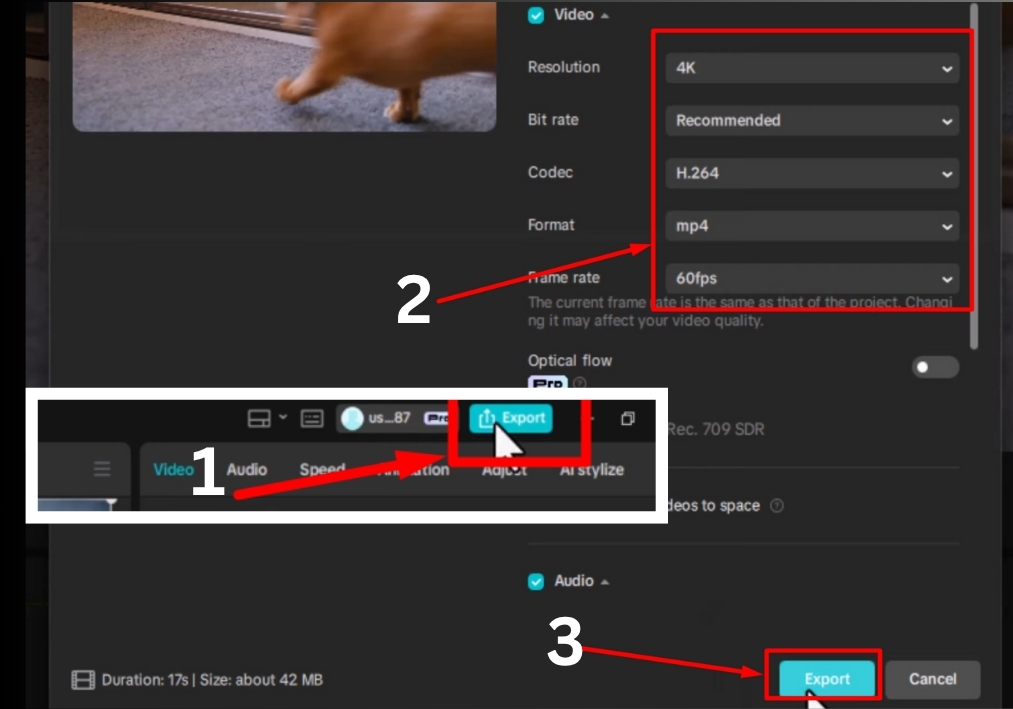
Head to the top right corner of the Capcut PC interface. You will see a button labeled Export. Click it to open the export settings menu, where you will fine-tune your video’s output.
Step #3
The first option you will see is resolution. For most platforms like YouTube or Instagram, 1080p is the go-to choice; it’s a solid standard for crisp, clear videos. Want to level up? Go for 4K for even sharper quality, perfect if you are aiming for a premium look.
Step # 4
Next up is bit rate. A higher bit rate means better quality, but it also makes your file size larger. To keep things simple, stick with the recommended option in CapCut. It strikes a great balance between quality and manageable file size.
Step # 5
For encoding, choose H.264. It’s widely supported across platforms and gives you excellent quality without creating massive files. It’s the sweet spot for most creators.
Step # 6
When it comes to format, MP4 is your best bet. It’s the most popular and widely accepted format online, making it ideal for sharing on social media or video platforms.
Step # 7
Frame rate affects how smooth your video looks. For a classic, cinematic vibe, go with 24fps or 30fps. If your video has a lot of fast-moving action, like sports or gaming clips, opt for 60fps for smoother motion.
Step # 8
Once you have dialed in all your settings, hit the Export button. Capcut will process your video, and you will have a high-quality file ready to share with the world!
And that’s all!
Your guide to the best export settings for CapCut on PC! By following these steps, you will create videos that look professional and are optimized for platforms like YouTube and Instagram.