
Creating rounded corners for your images or videos in Premiere Pro can add a professional touch to your projects. Whether you’re editing a vlog, a promo video, or a social media clip, this effect adds a modern touch. This simple effect softens the harsh edges of your media and gives it a more polished appearance.
Here’s a quick, step-by-step guide to get those smooth, rounded edges on your images.
Add Rounded Corners in Premiere Pro
Step 1: Select Your Clip
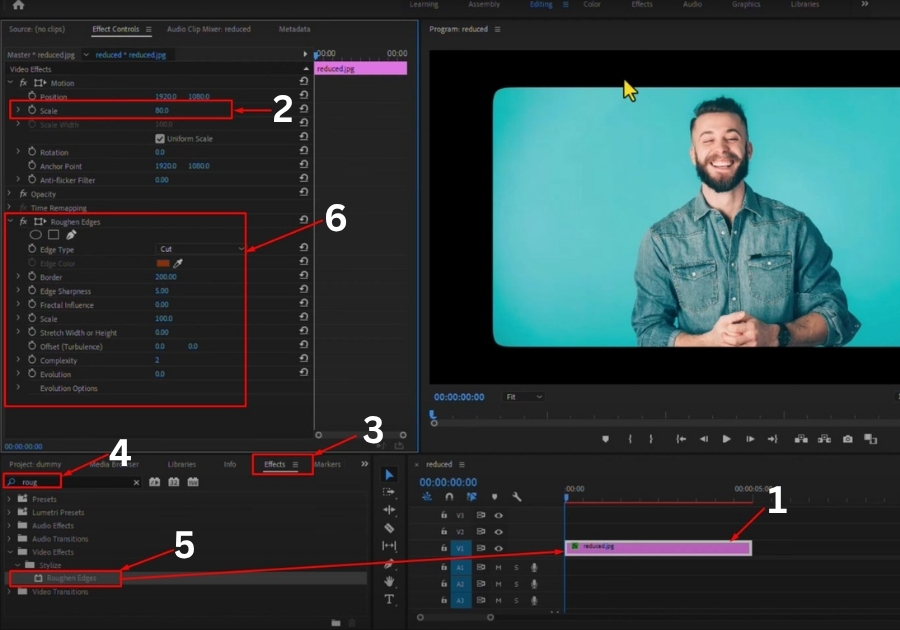
First, click on the image or video clip you want to round the corners on. Make sure it’s highlighted in your timeline.
Step 2: Scale It Down
Go over to the Effect Controls panel.
Under the Motion section, find Scale and adjust it to around 80%. This will give the rounded corners enough space to show without being cut off by the edge of the screen.
Step 3: Add the “Roughen Edges” Effect
Head to the Effects panel. In the search bar, type Roughen Edges.
Drag and drop this effect onto your selected clip.
Step 4: Adjust the Settings
Now go back to Effect Controls, and under Roughen Edges, tweak these settings:
- Edge Type: Set this to Cut
- Border: Set to 200%
- Edge Sharpness: Try around 5
- Fractal Influence: Bring this down to 0
You will notice your image now has nicely rounded corners!
Step 5: Fine-Tune the Look
Want more or less rounding? Just adjust the Border value; higher means more curve.
If you want softer or sharper edges, tweak the Edge Sharpness slider.
That’s it! With just a few clicks, you have added professional-looking rounded corners to your image in Premiere Pro.