Sometimes, your PDF just doesn’t look right. The words are too squished or spread too far apart and it’s all because of the line spacing.
Adjusting line spacing can make your document easier to read and look more polished. With Adobe Acrobat, tweaking line spacing is a breeze, and I’m here to go through it step by step, based on a simple method I recently came across.
Adjust Line Spacing in PDFs
Step 1: Open Your PDF in Adobe Acrobat
First things first, open Adobe Acrobat and load up the PDF file you want to edit.
Step 2: Click on “Edit PDF”
On the right-hand panel (or in the top menu, depending on your version), click on “Edit PDF.” This will activate editing mode and allow you to make changes to the text in your file.
Step 3: Select the Text You Want to Adjust
Click on the text or text box where you want to fix the line spacing. If you want to adjust everything on the page, just select all the text in that section.
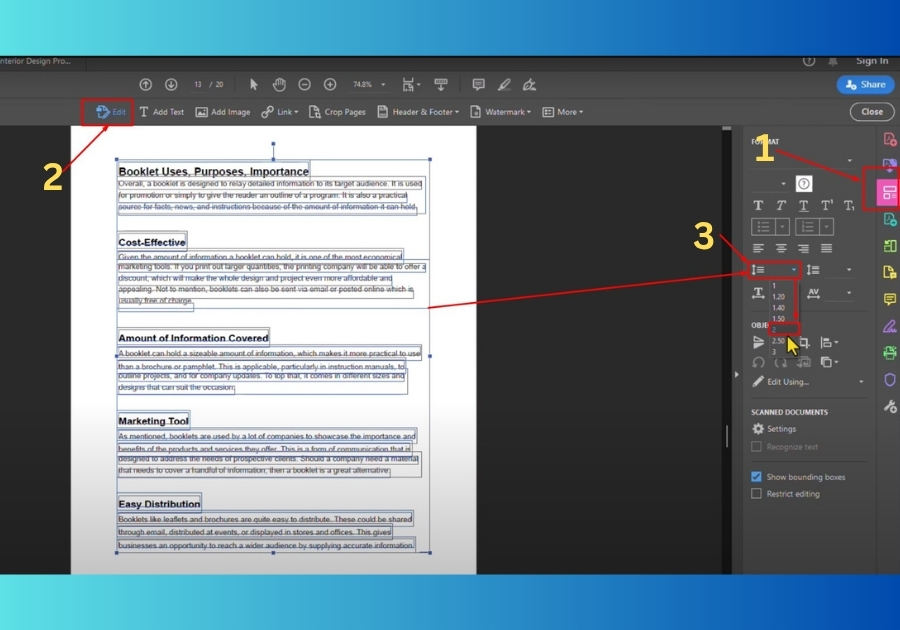
Step 4: Find the Line Spacing Option
Once your text is selected, a mini toolbar or side panel will show up with formatting options. Look for the “Line Spacing” setting. It usually appears as a dropdown next to icons that control text alignment and font.
Step 5: Adjust the Line Spacing
Click the dropdown next to Line Spacing, and you’ll see options to increase or decrease the space between lines. Play around with it until your text looks the way you want it.
Step 6: Save Your PDF
Once you’re happy with how it looks, don’t forget to save your file. Either hit Ctrl+S or go to File > Save to make sure your changes stick.
And that’s it!
You are done! Now your PDF should look cleaner and be much easier to read.