If Photoshop keeps warning you that your scratch disk is full, don’t panic; it’s a common issue and easy to fix.
The scratch disk is basically Photoshop’s extra workspace when your computer’s memory runs low. But when it gets clogged with old data, things slow down. Luckily, clearing it takes just a few quick steps.
Let’s walk through how to reset your scratch disk and free up space so Photoshop can run smoothly again.
Guide to Clearing the Scratch Disk in Photoshop
Step 1: Purge Photoshop’s Cache
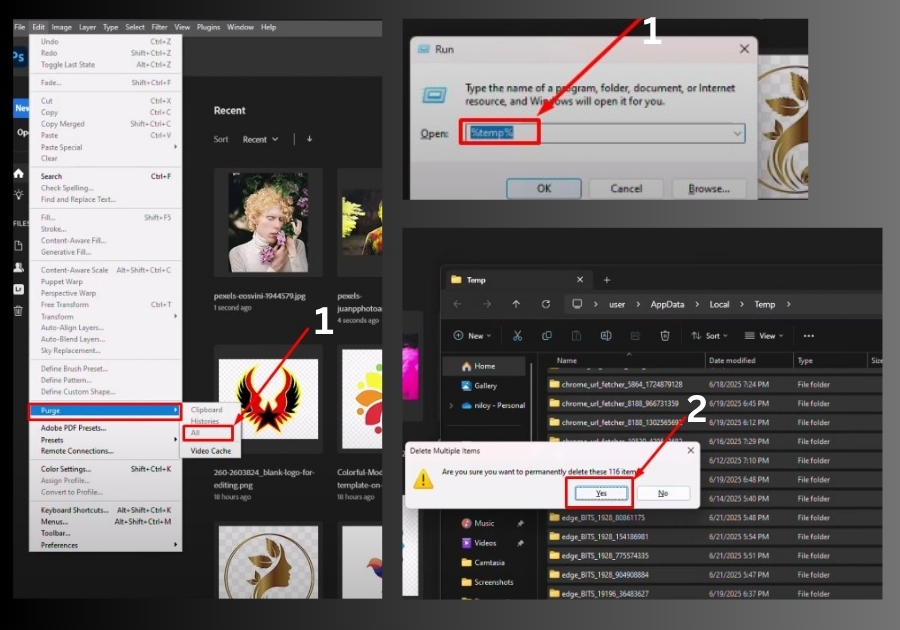
First, let’s clear out Photoshop’s internal cache. This is where the program stores temporary data, and purging it can free up your scratch disk.
- Open Photoshop.
- Click on the Edit menu at the top.
- Hover over Purge, then select All from the dropdown.
- Confirm the action, and Photoshop will delete all its cached files.
That’s it for the first step! This clears out Photoshop’s temporary data, but we’re not done yet. Let’s tackle your computer’s temp files next.

Step 2: Delete Temporary Files from Your Computer
Your computer also stores temporary files that Photoshop uses, and these can clog up your scratch disk. Here’s how to get rid of them:
- Press Windows Key + R to open the Run dialog box.
- Type %temp% (with the percent signs) and hit OK. This takes you straight to your computer’s temporary files folder.
- Press Ctrl + A to select all the files in the folder.
- Press Shift + Delete to permanently delete them. Confirm by clicking Yes when prompted.
Be patient, it might take a moment to delete everything, especially if there’s a lot of data.
Step 3: Relaunch Photoshop
Once you’ve purged Photoshop’s cache and deleted the temp files, go ahead and restart Photoshop. You should notice it runs smoother, and those annoying scratch disk errors should be gone.
Quick Tips
- Do this regularly: Clear your scratch disk every few weeks to keep Photoshop running smoothly.
- Check your storage: If errors persist, make sure your hard drive has enough free space.
- Set a new scratch disk: In Photoshop, go to Edit > Preferences > Scratch Disks to assign a different drive with more space.
And that’s it!
You’re now ready to dive back into your projects without Photoshop slowing you down. Got questions or still facing issues? Drop a comment below, and I’ll help you out!

