
If you’ve ever needed to sign a PDF document, you know how frustrating it can be without the right tools.
Digital signatures are a game-changer for anyone handling contracts, agreements, or official documents. They’re secure, professional, and save you from printing, signing, and scanning. Plus, Adobe Reader is free to use for this, so there’s no extra cost.
Here’s a step-by-step guide that shows you everything from creating your digital ID to placing your signature on a PDF.
Create a Digital Signature in PDF
Step 1: Open Adobe Reader and Access Preferences
First, open your PDF in Adobe Reader. Once it’s loaded, look at the top menu bar and click on Menu (or Edit in some versions). From the dropdown, select Preferences. This opens a new window where you can customize settings.
In the Preferences window, find the Signatures category on the left-hand side. Click on it, and under the Identities & Trusted Certificates section, hit the More button.
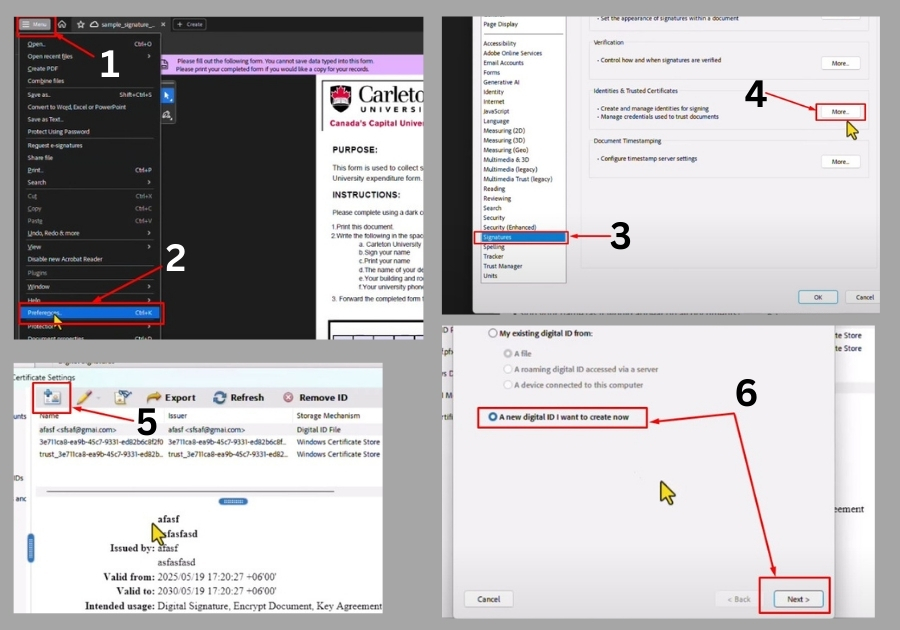
Step 2: Create a New Digital ID
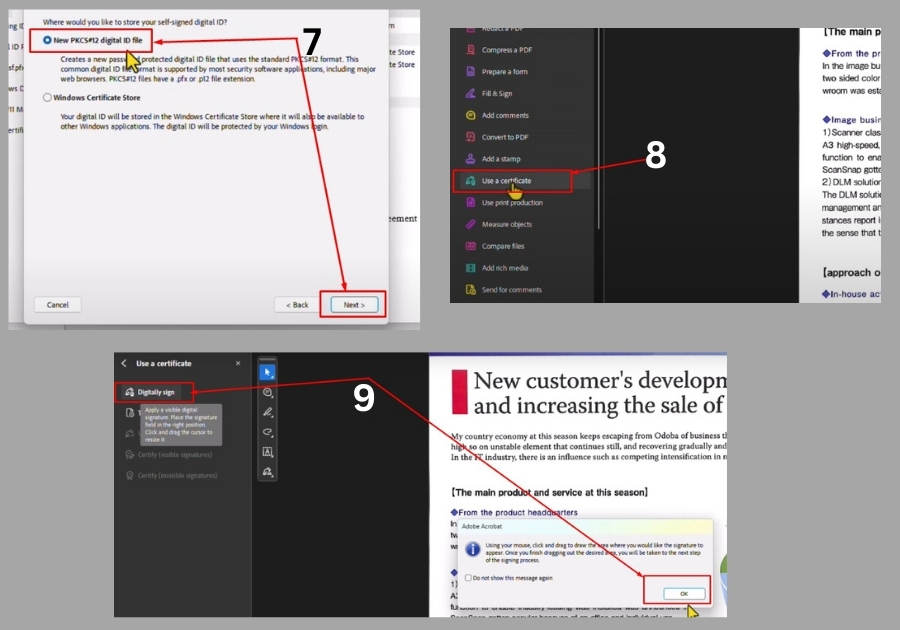
In the new window, you will see an option to add a New Digital ID. Click on it, then select A new digital ID I want to create now and hit Next. You will be asked where you want to store your digital ID. For most users, the default option works fine, so just click Next again.
Now, it’s time to enter your details. Fill in:
- Your name
- Your organizational unit (like your department, if applicable)
- Your organization name (e.g., your company or just your name if it’s personal)
- Your email address
- Your country/region (select from the dropdown)
You’ll also see options for Key Algorithm and Use Digital ID For. Stick with the default Key Algorithm unless you have a specific reason to change it. For Use Digital ID For, choose Digital Signatures and Data Encryption for maximum flexibility. Click Next when you’re done.
Step 3: Set a Strong Password
Every digital signature needs a password for security. Create a strong password that’s at least six characters long. Make it something memorable but tough to guess, think a mix of letters, numbers, and symbols. Type it in, confirm it, and click Finish.
See, your digital signature is created. You’ll see it listed in the signatures window, along with a preview of how it’ll look. Click OK to close the window.
Step 4: Add Your Digital Signature to a PDF
Now that your signature is ready, let’s add it to your PDF. Go to the All Tools section in Adobe Reader (usually on the right-hand side or under the Tools menu). Click View More, then look for the Use a Certificate option. Select Digitally Sign and click OK.
Next, you’ll need to choose where to place your signature on the PDF. Click and drag to create a box where you want the signature to appear. Once you’ve selected the area, a window will pop up showing all your created digital signatures. Pick the one you just made and click Continue.

You’ll see a preview of your signature. Enter the password you created earlier, then click Sign. Adobe Reader will ask you to save the PDF first, so choose a location and name for the file. After saving, your digital signature will be added to the PDF in the spot you chose. Done!