
Merging PDFs is a game-changer when you need to streamline documents. Instead of juggling multiple files, you get one neat package. It’s perfect for presentations, project submissions, or just keeping your digital life tidy.
Adobe Acrobat makes it easy to get it done. In this guide, I will show the steps to merge your PDFs using Adobe Acrobat.
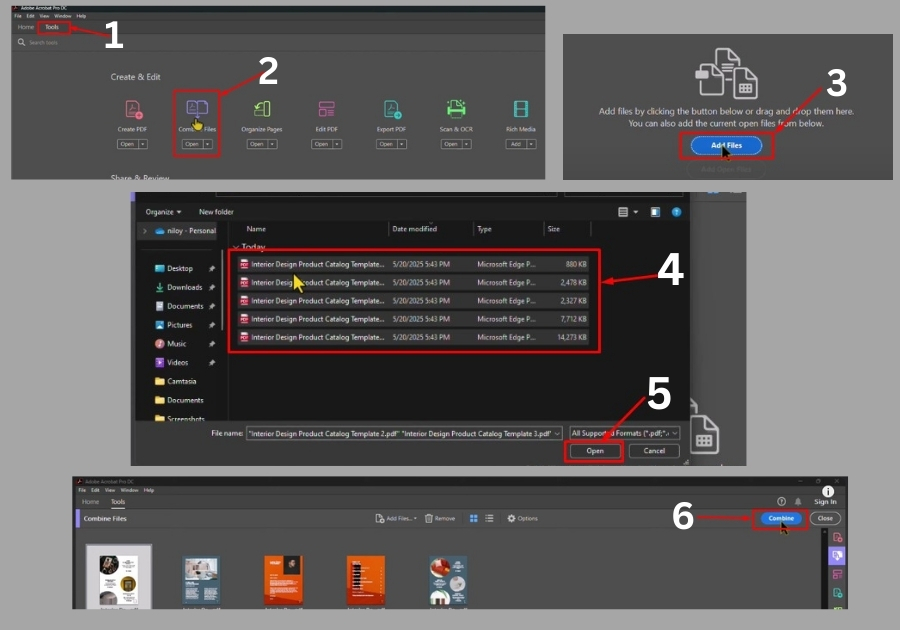
Step-by-Step Guide to Merging PDFs
Step 1: Open Adobe Acrobat
First, fire up Adobe Acrobat. Once you are in, head over to the Tools section on the top menu.
Step 2: Select “Combine Files”
In the Tools menu, scroll around a bit until you spot Combine Files. Click on it. This is the magic button that will let you merge your PDFs.
Step 3: Add Your PDF Files
Now, click on Add Files. A window will pop up asking you to select the PDFs you want to merge. Find your files, select them all, and hit Open.
Step 4: Rearrange If Needed
Once your files are loaded, you’ll see them listed in the order they will appear. Want to change the order? Just drag and drop them around until they’re exactly how you want.
Step 5: Add More (If You Forgot Some)
If you realize you missed a file or two, don’t worry. Click on Add Files again and toss in whatever you forgot the first time.
Step 6: Combine!
Happy with the order? Now, click the Combine button. Acrobat will do its thing, and in a few seconds, you will have a shiny new PDF that includes all the files you picked.
Step 7: Save Your New PDF
Last step: hit Save, pick where you want to store your file, and give it a name you will remember.
And that’s it! Merging PDFs doesn’t get much easier than this. Just a few clicks and you’re done.