Double-sided printing isn’t just about saving paper. It’s also great for creating polished documents like booklets, handouts, or presentations. Plus, it’s eco-friendly and cuts down on clutter.
Printing a double-sided PDF is super easy with Adobe Acrobat or Adobe Reader. When you are saving paper or creating a professional-looking document, follow this quick guide.
Print Double Sided PDF Adobe Acrobat
Step 1: Open Your PDF in Adobe Acrobat
First, open the PDF file you want to print. You can use either Adobe Acrobat or Adobe Reader, whichever one you have installed on your computer.
Once the file is open, you will see your document right there, ready to go.
Step 2: Head to the Print Settings
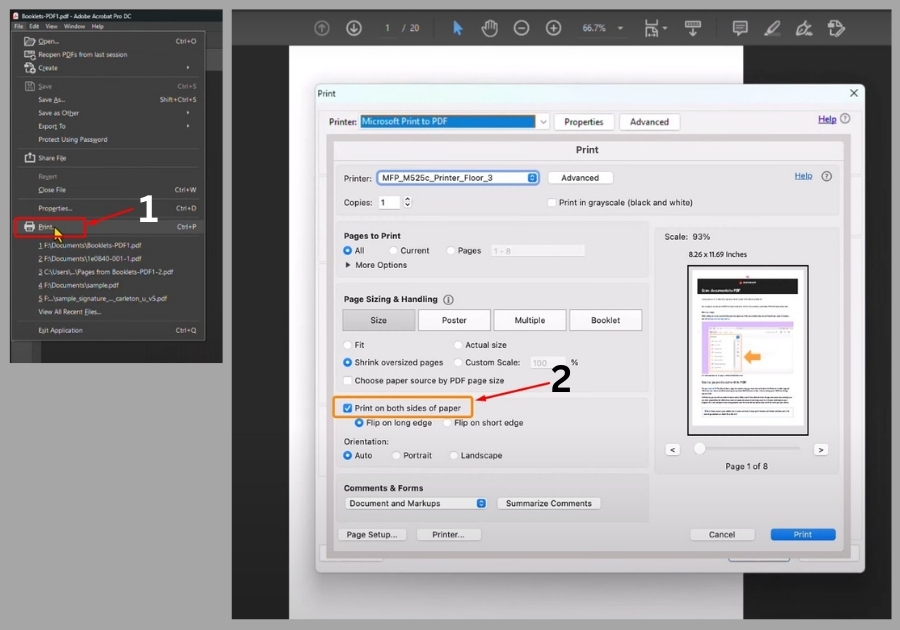
Go to the top menu and click File, then select Print from the dropdown.
A print window will pop up.
Step 3: Choose Your Printer and Settings
Here’s what you will want to do next:
- Select your printer from the list at the top.
- Decide how many copies you need.
- Choose which pages to print (all pages or just a range).
- Under Page Sizing & Handling, look for the “Print on both sides of paper” checkbox.
This is the setting that tells your printer to do double-sided printing.
Step 4: Choose How to Flip the Pages
Once you have checked the box for double-sided printing, you will see two options:
- Flip on long edge (best for regular reading like books)
- Flip on short edge (good for calendars or landscape layouts)
Pick the one that fits your document’s layout.
Step 5: Click Print
Last step, click that Print button.
Your printer will take care of the rest, giving you a neatly printed, double-sided document.
Bonus Tip
If your printer doesn’t support automatic double-sided printing, you may need to manually flip the pages and feed them back in for the second side. Most newer printers handle this automatically though.
And that’s it! You have successfully printed your PDF double-sided using Adobe Acrobat. Easy, right?