Got a PDF file that’s taking up way too much space? Maybe it’s a 50MB file, and you need it smaller without sacrificing quality.
Reducing PDF file sizes is a game-changer when you are emailing documents, uploading them to websites, or just trying to save storage space. With Adobe Acrobat’s built-in tool, you don’t need any fancy software or tech know-how.
Here’s a simple guide to reduce your PDF file size in just a few clicks.
Reduce PDF File Size In Adobe Acrobat
Step 1: Open Your PDF in Adobe Acrobat
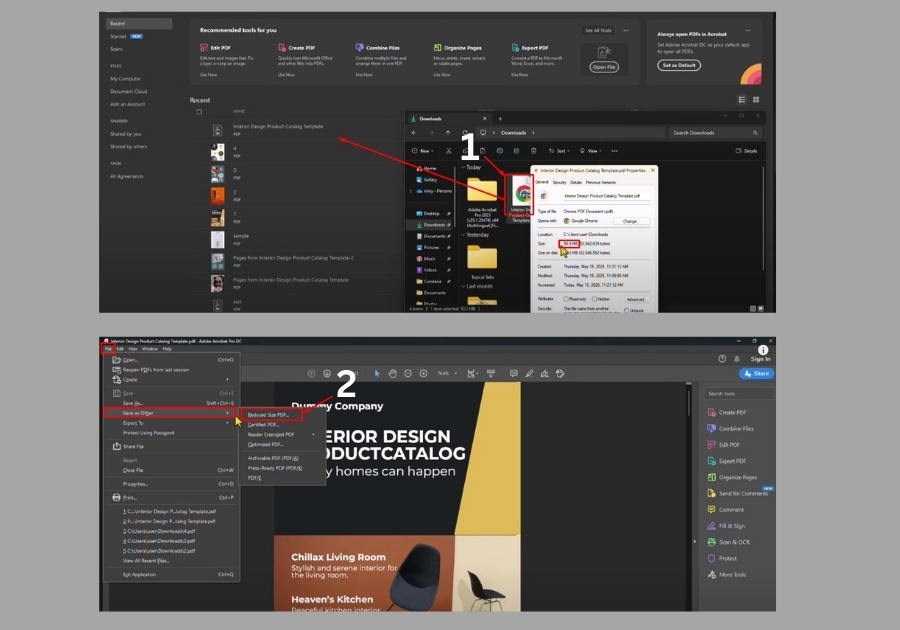
Start by opening the PDF file you want to shrink. You can double-click it if Adobe Acrobat is your default PDF viewer, or open it directly through the app.
Once the file is open, check the current size by going to:
File > Properties
You will see something like “50 MB” or more. That’s pretty large, especially if you plan on sharing or storing a lot of PDFs.
Step 2: Use the Built-In “Reduce File Size” Tool
Now for the main part:
- In the top menu, click on File.
- Hover over Save As Other.
- Click Reduced Size PDF.
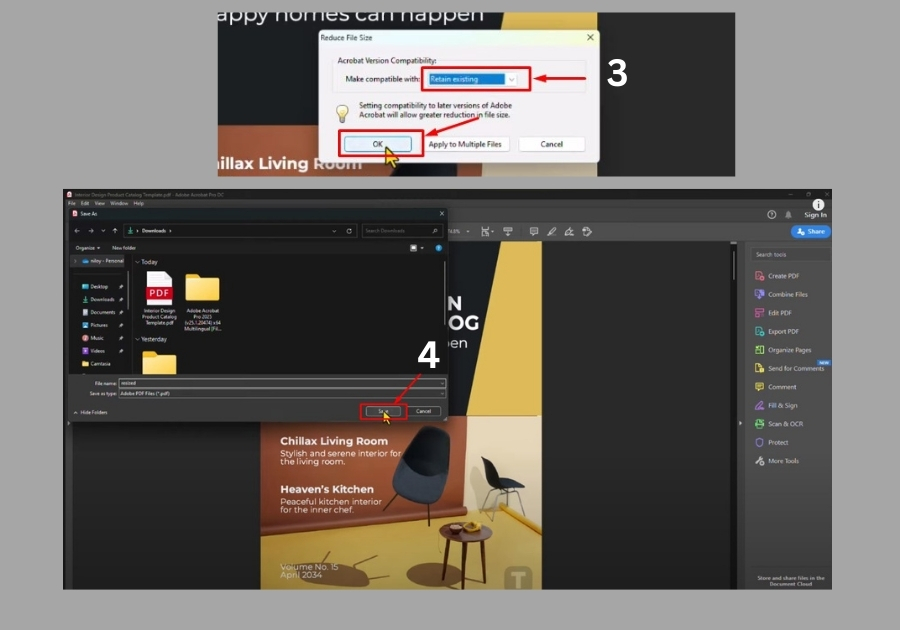
You will get a small pop-up asking about compatibility. Just select:
Retain existing
Then hit OK.
This tells Acrobat to shrink the file while keeping it as compatible as it already is. No changes to how it opens or looks.
Step 3: Save the New, Smaller PDF
After you hit OK:
- Choose a location to save the smaller PDF.
- Give it a new name (so you don’t overwrite the original unless you want to).
- Click Save.
Acrobat will now do its thing. Depending on the file size, it may take a few seconds.
Step 4: Check the File Size
Once it’s done, go to the folder where you saved the new PDF.
Right-click it > Properties
You’ll see a big difference. In our example, the original was 50 MB. After compressing, it dropped to just 11 MB without any visible loss in quality.
Adobe Acrobat’s built-in compression tool optimizes images and streamlines the internal structure of the PDF. It’s perfect for everyday use and doesn’t require any extra software or tech skills.