
Ever edited a video and ended up with some text stuck on the screen? As a video editor, this is a common scenario. Maybe it’s a watermark, caption, logo, or a subtitle that’s distracting. If you are using Adobe Premiere Pro, you can easily get rid of it with a simple trick.
Here are the simple steps you need to follow to remove text from a video, so your footage looks clean and professional.
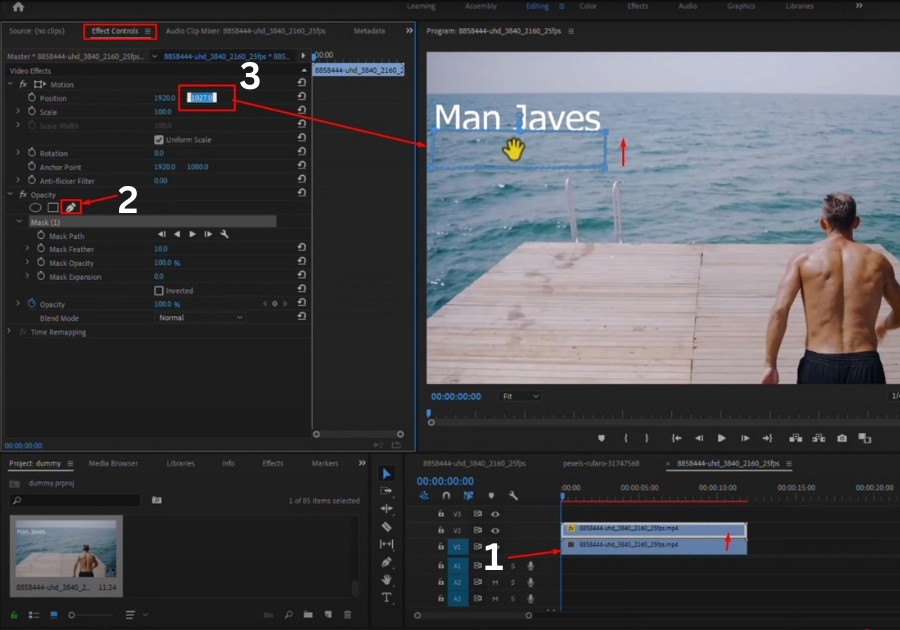
Remove Text from Video in Premiere Pro
Step 1: Duplicate Your Video Clip
Select your video clip in the timeline. Now hold down the Alt key (Option key on Mac) and drag the clip upwards to create a duplicate right above the original.
This duplicated clip is going to help you cover up the text in the next steps.
Step 2: Select the Top Clip
Click on the top (duplicated) video layer. Head over to the Effect Controls panel and look under the Opacity section.
There you will see a pen tool icon. Click on it to activate the masking tool.
Step 3: Draw a Box Around the Text
Now, draw a box around the text you want to remove. Try to include only the text area, either just above it or below it, so it doesn’t affect too much of the video.
This mask will let us replace the text area with something cleaner from the same video frame.
Step 4: Move the Box to Cover the Text
Once the box is in place, go back to Effect Controls and look for the Position values under the mask. You will see two numbers; focus on the second one (Y-axis).
Slowly increase or decrease that value to slide the mask vertically until it covers the text. It’s like borrowing pixels from another part of the frame to hide the text.
See the text disappears!
Step 5: Check the Result
Scrub through your timeline and check the video. If everything looks smooth and the mask blends well with the background, you’re good to go.
That’s it! You have successfully removed the text without needing any fancy plugins or outside software.