
Watermarks can be distracting, especially if you’re sharing a document professionally or just want a clean look. Whether it’s a draft stamp or a company logo, removing it with Adobe Reader is quick and doesn’t require any extra software.
Here’s exactly how to do it.
Remove Watermark from a PDF in Adobe Reader
Step 1: Open Your PDF in Adobe Reader
First, open your PDF file using Adobe Reader. Make sure the watermark is visible so you know which one you’re removing.
Step 2: Head to the Edit Menu
Once your file is open, look at the top menu bar and click on Edit. This is where all the magic happens.
Step 3: Find the Watermark Option
Under the Edit menu, you’ll see an option labeled Watermark. Click on it. A small dropdown will appear.
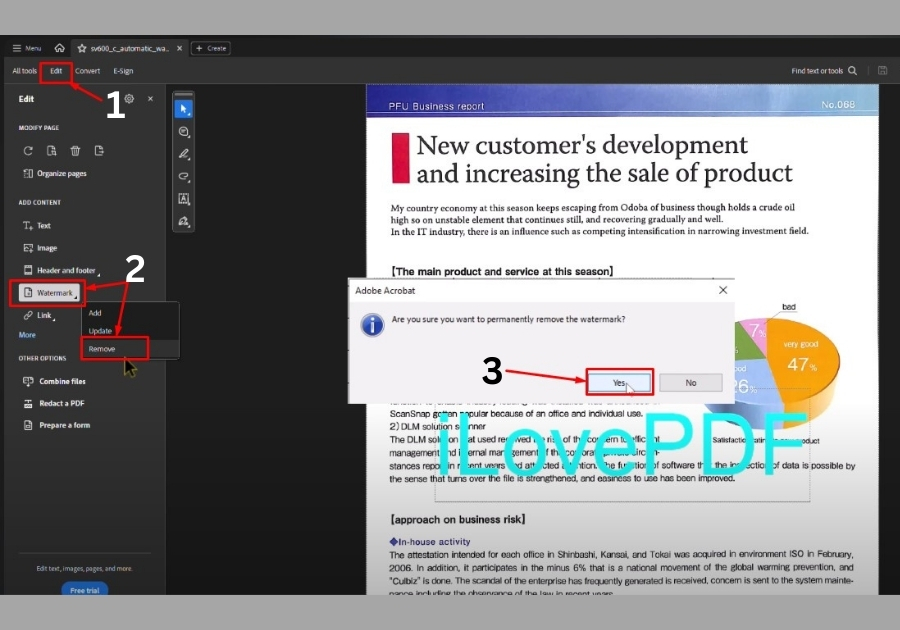
Step 4: Click on Remove
From the dropdown, go ahead and click on Remove. A pop-up will appear asking if you’re sure you want to permanently remove the watermark. Hit Yes.
Step 5: Save Your Clean PDF
See, your watermark is gone! All that’s left to do is save your PDF so the changes stick. You’re done.
A Few Things to Keep in Mind
- Make sure you have permission to remove the watermark, especially if the PDF isn’t yours or contains copyrighted content.
- This method works with Adobe Reader, but if you’re using another PDF editor, the steps might be slightly different.
- Always save a backup of your original PDF just in case you need to revert to it later.