
Tired of printing out documents just to sign them and scan them back? Don’t worry, you can handle it all inside Adobe Acrobat.
Adding a signature to a PDF is easy when you know the right trick. Adobe Acrobat makes it super simple with flexible options to suit your style. Maybe you type, draw, or upload. Next time you need to sign a document, you will be done in minutes.
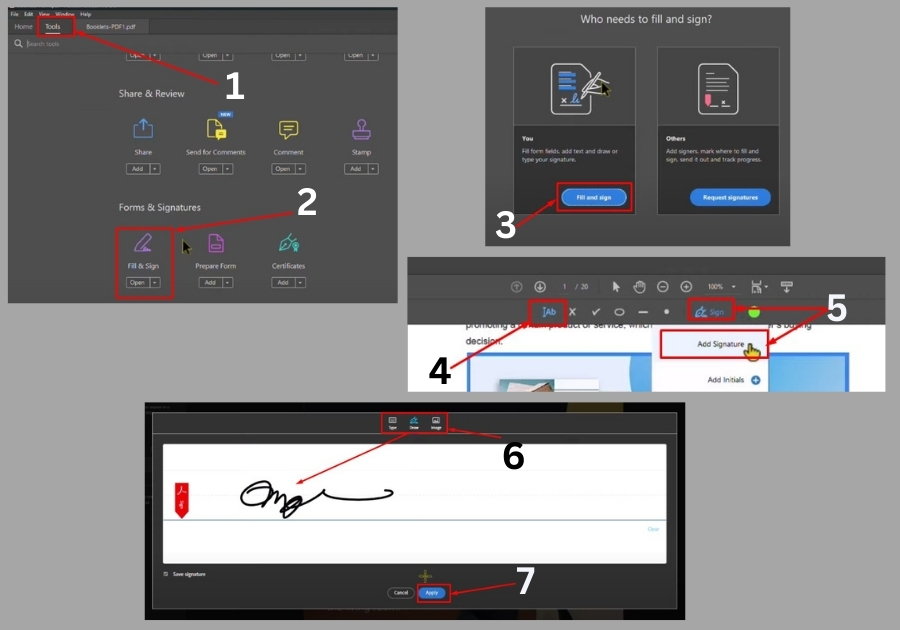
Add your signature digitally in a few quick steps below:
Signing PDFs in Adobe Acrobat
Step 1: Open Your PDF in Adobe Acrobat
Start by opening your PDF in Adobe Acrobat. Once it’s loaded, you are ready to roll.
Step 2: Head to the “Fill & Sign” Tool
At the top or side menu, click on “Tools.”
Scroll down a bit until you find “Forms & Signatures.”
Click “Fill & Sign.”
Step 3: Choose Who’s Signing
When prompted with “Who needs to fill and sign?”, select “You.”
This tells Acrobat that you’re the one adding the signature.
Step 4: Add Your Signature
Now for the fun part, adding your signature.
Click on the “Sign” icon and then choose “Add Signature.”
You’ll get three options to create your signature:
- Type: Just type your name, and Acrobat will turn it into a signature-style font.
- Draw: Use your mouse or trackpad to draw your signature by hand.
- Image: Already have a PNG of your signature? Upload it directly from your computer.
Step 5: Save & Place Your Signature
Before you hit apply, you can check “Save Signature” if you plan to reuse it later.
Click “Apply.”
Now, just click anywhere on your PDF where you want your signature to appear.
Step 6: Resize & Adjust
Need to make your signature bigger or smaller? No problem. Just drag the corner of the signature box to resize it as needed.
And that’s it! Now your PDF is signed and ready to go.
Signing documents digitally is fast, secure, and convenient with Adobe Acrobat. Whether you’re signing a contract, an application, or any official form, this built-in tool has got you covered.