Ever opened an image in Photoshop and noticed it’s locked as an Index Layer? Yeah, super annoying, especially when you’re ready to get creative but can’t even move or edit anything. The good news is that there’s a super simple fix, and you don’t need to be a Photoshop pro to do it.
Here’s how to unlock the Index Layer in Photoshop in under 10 seconds:
Step-by-Step: Unlocking the Index Layer
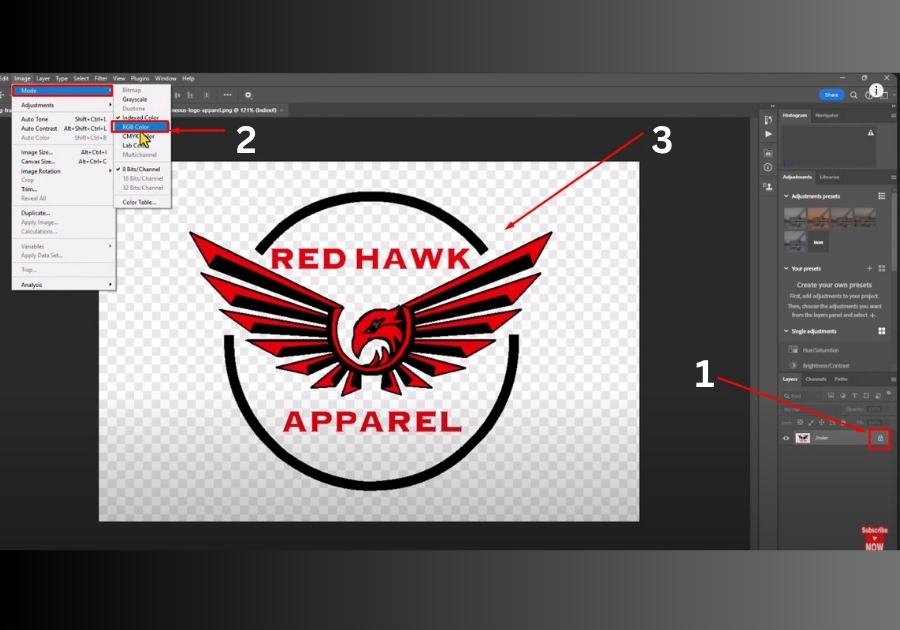
- Open Your Image: Load your image in Photoshop. You’ll see the index layer in the Layers panel, usually labeled as “Index” and locked with a little padlock icon.
- Go to the Image Menu: At the top of Photoshop, click on the Image menu in the toolbar.
- Find the Mode Option: Hover over the Mode option in the dropdown menu. This is where you’ll change the color mode of your image.
- Switch to RGB or CMYK: Select either RGB Color or CMYK Color from the list. RGB is great for digital projects like web graphics, while CMYK is better for print. Pick the one that suits your project.
- Check the Layers Panel: Once you switch the color mode, the index layer will automatically unlock. The “Index” label should disappear, and the layer will now be called “Background” or “Layer 0,” ready for editing.
That’s it!
Your layer is now unlocked, and you can edit, add effects, or do whatever you need for your project. This quick fix takes just a few seconds but saves you a ton of hassle. Now you can jump right into your creative work without any roadblocks.