
Got a pixelated photo that’s too small or blurry?
Don’t throw it away just yet. With the right Photoshop techniques, you can breathe new life into those low-resolution images and make them look surprisingly sharp and detailed.
This step-by-step guide will show you exactly how to upscale and enhance your pictures like a pro.
Guide to Make Low Quality Pictures High Quality in Photoshop
Step 1: Open Your Image and Adjust the Size
Start by opening your low-quality image in Photoshop. Once it’s loaded, head to the Image menu at the top and click on Image Size.
In the dialog box that appears, make sure you’re working with pixels as your unit of measurement. Here’s where the magic begins:
- Check the Resample box (this is crucial for enlarging your image)
- Click on the dropdown menu next to it and select Preserve Details (enlargement)
- Set your resolution to 400 pixels per inch
- For the width, enter 5559 pixels (the height will adjust automatically to maintain proportions)
Click OK and watch Photoshop work its magic. Your image will now be significantly larger, though it might look a bit soft at this point.
Step 2: Duplicate Your Layer
Before we start sharpening, it’s smart to work on a duplicate layer. This way, you can always go back to the original if needed.
Right-click on your background layer and select Duplicate Layer. Make sure this new duplicated layer is selected for the next steps.
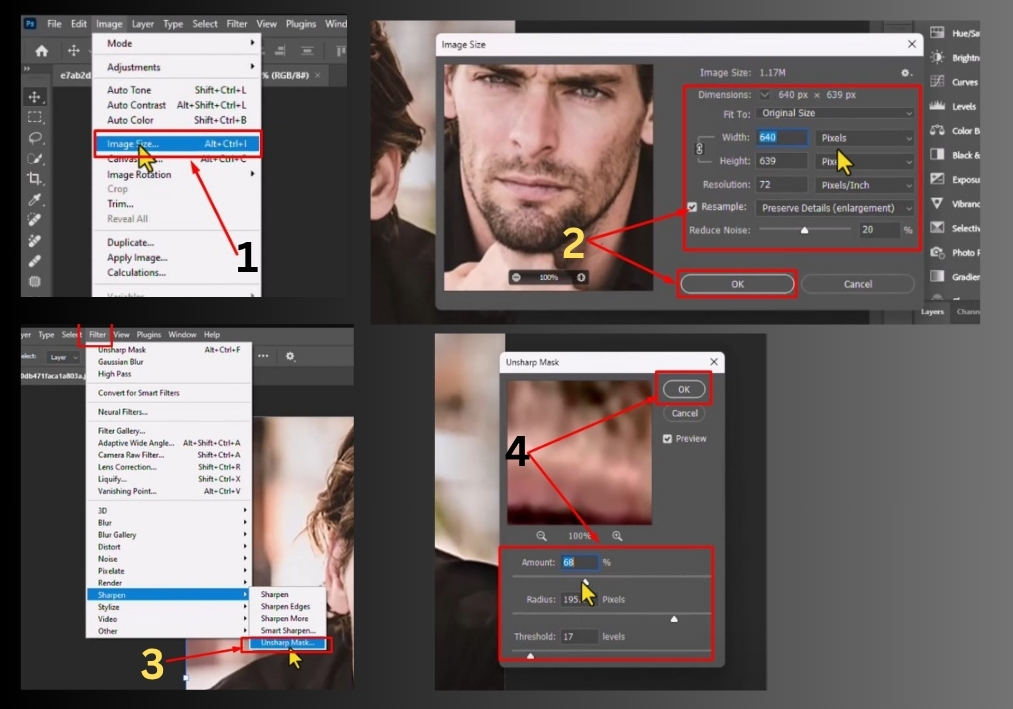
Step 3: Apply Unsharp Mask Filter
Now we’ll add some sharpness back to your enlarged image. Go to Filter in the menu, hover over Sharpen, and click on Unsharp Mask.
This filter might sound confusing, but it’s actually one of the best tools for making images crisp. Here’s how to use it:
- Amount: Start with a value between 60-70. You can experiment to see what looks best for your specific image
- Radius: Adjust this slider while watching your image preview
- Threshold: Fine-tune this setting to avoid over-sharpening
Take your time with these settings. Each image is different, so what works for one might not work for another. When you’re happy with the preview, click OK.
Step 4: Add a High Pass Filter for Extra Sharpness
For an extra boost in clarity, we’ll add one more filter. Go to Filter again, hover over Other, and click on High Pass.
Set the radius to 2.5 pixels and click OK. Your image might look weird and gray right now, but don’t worry – we’ll fix that in the next step.
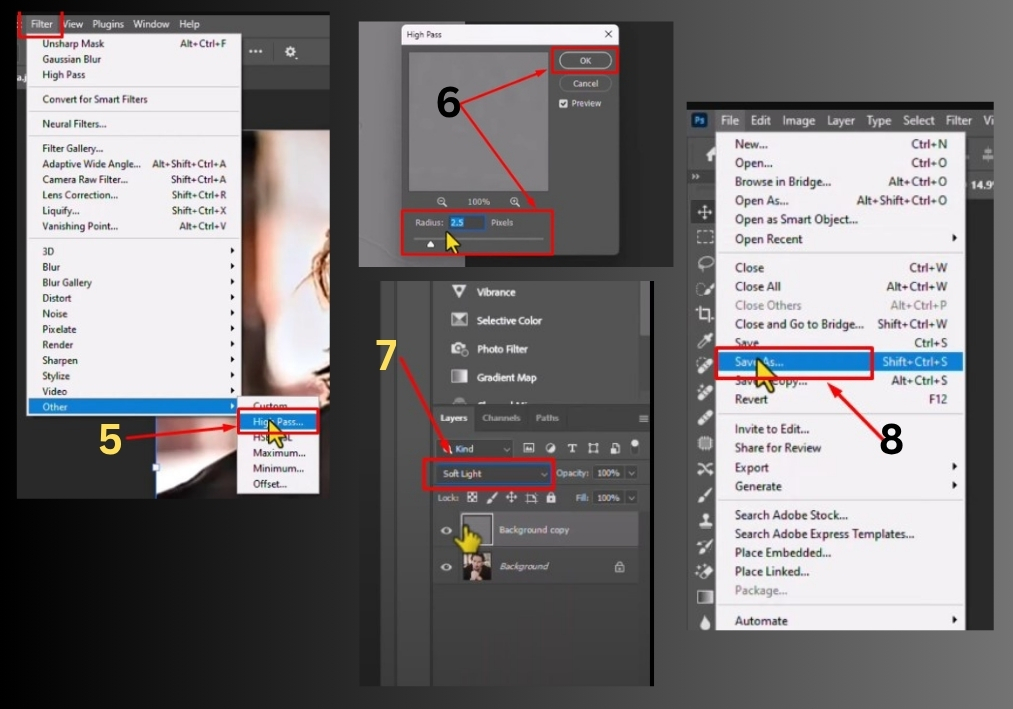
Step 5: Change the Blending Mode
With the High Pass filter applied, you need to change how this layer blends with the image below it. Look for the Blending Mode dropdown (it probably says “Normal” right now) and change it to Soft Light.
Instantly, your image should look much sharper and more detailed. The High Pass filter, combined with Soft Light blending mode, is a classic technique for adding subtle sharpness without making the image look artificial.
Step 6: Save Your Enhanced Image
Once you’re satisfied with the results, it’s time to save your work. Go to File and then Save As to create a new file, or use Export if you want to save it in a different format like JPEG or PNG.
With these steps, you can breathe new life into any blurry or low-res photo. Try it out, and let your images stand out!